Tuesday, 25 May 2021

Allotment Growing - May 2021


This month has been wetter and cooler than usual for the time of year. This is partly due to the jet stream in the high atmosphere moving south and trapping the UK into cold air streams from Greenland and the North Atlantic. However - we've had some nice days and sunshine. I've got a fair bit done on the plot, although I am a bit behind due to the weather.


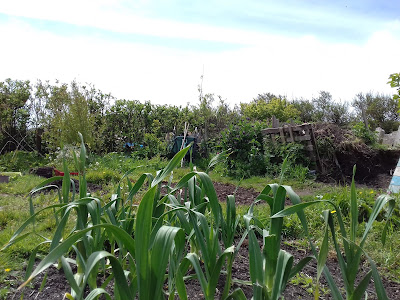
My Elephant Garlic - planted back in December, is growing really well. I'm looking forward to a good harvest and I'll start in June. As the saying goes with garlic "Sow on the shortest day, harvest on the longest day."


I've been sowing and growing Peas back at home, using cardboard tubes. This means that they can be planted straight into the ground without disturbing the roots. I'm now planting these out onto a prepared bed, with support from some wire fencing for them to grow up.


I'm pleased with my new compost bins, constructed from old pallets. I'm now moving compost from the old bins. Once they are emptied I'll have space for some new growing beds. I'll then close out the left hand bin, so that the compost can continue to rot down for use in Spring 2022. The right hand bin will be my "live bin" and I'll continue to fill it through the rest of the year.


In my "wild area" the Comfrey is flowering beautifully. Its full of bees, exactly what I wanted. In due course I'll harvest some of the leaves to make liquid fertiliser.


I've had some lovely days and evenings on the plot, with more to come and hopefully better weather as the season moves into June.

Tuesday, 18 June 2019

Allotment Growing - Bees - Wildflowers and Weeds

Bees On The Allotment


Much has been said and written in recent years about the importance of bees for growers -
and the possible decline of these wonderful creatures.

I have nothing to add to that - or to the seemingly endless recent goings on about "climate change" and "war on plastic". I just focus on the practicalities (not politics!) of growing lovely vegetables and flowers. Also the sheer joy of it.


Bees On The Allotment


The importance of bees on the allotment is fairly obvious - they pollinate my plants and so help to produce more fruits and flowers. They are also rather beautiful.

So they are worth encouraging - and a simple way to do this is to include an area (or areas) for flowers on the allotment plot.


Wildflowers On The Allotment


On mine I have a small(ish) area reserved for wildflowers on one side. Over the last couple of years I've sown some Wildflower seeds and planted out a few Sunflowers. I've also allowed some weeds to grow - although some of these need a bit of control as they can take over and "bully out" the other plants.


Growing Comfrey On The Allotment


Next to that I've also planted a small patch of Comfrey. This has a double benefit - as well as the flowers attracting bees the plants can be harvested for compost and liquid fertiliser.


Allotment - Wild Foxgloves


I also allow the margins of my plot to grow naturally - just the few inches along each fence. Some wildflowers seed themselves naturally here, such as the beautiful Wild Foxgloves in the photo above.


Allotment Growing - Green Manure - Mustard


Green Manures can also add to all of this - especially those that flower in Spring / Summer such as the Mustard on my plot above.

So - a few simple steps to encourage bees onto my plot, add some beauty and improve my crops - good all round!

Wednesday, 12 June 2019

Nettle Liquid Fertiliser - A Free Resource

Nettle Liquid Fertiliser - A Free Resource


One of the things that I do every Spring is to get started on making my Nettle Liquid Fertiliser.

Nettles are plentiful around the margins of our allotment site in West Cornwall, as they are in most places around the UK. Another wonderful free resource to be exploited - and easy to do so.

The fertiliser can be diluted in a watering can and used to boost crops - exactly like the liquid plant feeds that you buy from the garden centre. The obvious difference is that you can make this yourself, so it's free, apart from a little time and effort.


Nettle Liquid Fertiliser

The method is very simple. First gather your nettles - obviously its best to wear sturdy gardening gloves to avoid getting stung. I simply cut the tops off with a pair of scissors or secateurs then collect them in a plastic container.


Nettle Liquid Fertiliser

Next place the container in a corner of your allotment plot, add the nettles and cover with water.

Then leave them for three or four weeks to rot down, add more water if needed. The liquid will turn a green colour and the nettle stems will sink to the bottom.

Dip your watering can in and gather an inch or two depth of the liquid, top up the can with fresh water and water onto your growing beds and plants as and where needed.

Alternatively, if you have a mesh of some sort you can filter the liquid into another container to store, dilute and use later.

A rough guide is that the diluted feed for the plants should be the colour of weak green tea.

You could add some Comfrey to the mix if you have any growing, this will only add to the goodness in your fertiliser. Or this can be used on its own in the same way as the nettles.


Comfrey On The Allotment

Both Comfrey and Nettles are rich in Nitrogen which will encourage and feed green leafy growth.
Comfrey is also rich in Potassium which helps to set flowers and fruit.

You can keep adding more nettles and water to the container throughout the growing season. Simply add all of the residue to the compost heap when finished.

One note of caution - this mixture can get a bit smelly and attract flies. So - as I discovered for myself, its something best done on the allotment plot rather than in your back garden / yard at home.

Well worth doing though, another free resource and one vastly under-used by growers in my opinion.


You might also find these articles helpful:

Free Resources - Leaf Mould - Allotment With A Sea View Blog

How To Make Nettle and Comfrey Feed - Monty Don - BBC Gardeners World

Sunday, 28 January 2018

Sunday On The Allotment - Leeks and Compost

St Ives Cornwall Allotment - January


Dry and fairly mild weather in West Cornwall today - so I headed out happily to my plot. As last week I was determined to get on with preparations for Spring. A nice walk out along the St Ives - Zennor road, then up the lane to Trowan. As usual I poured myself a cup of tea, lit a cigarette and had a quick look round the plot. All looking fairly good. The I got down to work.

Allotment Growing - Leeks

My first task for the day was harvesting the last of the leeks. I've been growing these through Summer and Autumn and digging them up as needed. Really satisfying to think that I sowed the seeds way back in Spring 2017. Leeks are a crop that need to be sown early but will usually grow on and stand on the plot right through Winter. If you haven't grown Leeks before take a look a my blog post:
Spring - Sowing Leeks In Pots

Allotment Growing - Adding Compost

Once the leeks were out I continued preparing the bed for Spring planting. I hoed it over to remove a few weeds and tidied up the edges. Then I added a layer of my own compost, made on the plot.

This bed is earmarked for Sweetcorn and Squash this season, so probably won't be planted up until early June. What I'll probably due in the meantime, once the weather warms up a bit, is sow some Green Manure to keep the ground covered.

Allotment Growing - Pallet Compost Bin

I was really happy to be digging out my own compost. I "topped out" this bin way back in October 2016. At the time it felt like it would be ages before it was ready to use - but now here I am adding it back to my plot - and its broken down beautifully into fine crumbly black stuff. Classic recycling - the plants took nutrients out of the soil in Summer 2016, the green waste from the crops went into the compost bin, now all that goodness is going back into the ground.

Allotment Growing - Preparing Beds

So - the end result - another growing bed ready for Spring planting.
Another very enjoyable and productive morning on my little plot!

Friday, 26 January 2018

A Year on the Allotment - January - Allotment Plan

Planning Your Allotment
A Year on the Allotment - January - Allotment Plan


A Year on the Allotment

A series that aims to help new allotment growers to get started and produce lovely crops to eat.
This post is about planning your allotment.

1.3 January - An Allotment Plan.

One thing well worth doing when you get your first plot, then at the start of each new growing year, is a plan for your allotment.

You can do this with an online computer based tool, or the "old-fashioned" way with pen / pencil and paper. Although I have worked as an IT professional for more than 30 years, I still prefer doing this on paper. It works for me - but its up to you.

Here are some good reasons for putting together an allotment plan:
  • Gets you thinking about what you want to grow.
  • You can work out the best use of space.
  • You can make a start on a list of seeds and other supplies needed.
  • Its fun! Gets you looking forward to a year ahead on the plot.
My plan includes the layout of the plot, where crops will go and then a list of seeds and other items that I need to obtain for the coming season.

Allotment Plan

I start by drawing out the basic layout - the "fixed" items like the shed and compost bins, pathways, the current layout of the growing beds.

If you have a new plot and its an empty "blank canvas" then this will be more a plan of what you want - rather than how things are now.

I then work on the more detailed layout of the beds - what will be sown or planted and where.

I use a crop rotation system. Basically this means moving my crops around on a four year cycle. Based on four groups:
  • Potatoes.
  • Beans and Peas.
  • Brassicas.
  • Onions and Roots.
My plot is divided into four corresponding areas and then I rotate the crops around each year. So - for example - potatoes in area 1 in 2015, area 2 in 2016, area 3 in 2017, area 4 in 2018 .... then back to area 1 in 2019. Beans and Peas will be sown in 2018 in the area that had potatoes in 2017 .... and so on ....

Allotment Plan

Some crops, such as Sweetcorn, Spinach and Squash, don't fall into any of these groups and so, in principle, can be grown anywhere. But I still avoid growing the same thing in the same place two years running.

The reason for this rotation is that the different crops nurture different pests and use different nutrients from the soil. So you reduce the build up of these pests and make best use of the soil. You don't have to do this, you may not have enough space, you may not think its worth the effort. I think its worth doing but its not vital. Up to you.

So - the next step is deciding what you want to grow.

This is largely a matter of preference, it also depends on local conditions and also, of course, the nature of your plot.

I have certain "staple" crops that I grow nearly every year. My reasons are a combination of things that are fairly reliable and easy to grow - also things that I like to eat! So these are some ideas for you - although the possibilities are almost infinite:
  • Potatoes
  • Broad Beans
  • French Beans.
  • Peas.
  • Sweetcorn.
  • Squash.
  • Leeks.
  • Cabbage.
Bear in mind that I do not have a greenhouse or polytunnel - but if you do it will extend the possibilities considerably. You could look at crops such as chillies, grapes, melons - and lots more.

Allotment Plan

Some crops also need two or three years to mature, so need semi-permanent beds. These include asparagus, strawberries and other fruit. So include space for these on your plan if you want to grow them. The rest can be rotated each year, as described above, if you wish.

I also include a couple of wildflower areas as well - because they look nice - and they attract bees.

Then each year I choose at least one "new and unusual" plant - something that I haven't grown before and looks interesting. Last year I tried growing Cucamelons - which failed to produce anything. The year before I tried Black Salsify - which produced good crops. I enjoy trying things out - and inevitably - sometimes things work - sometimes not!

So based on your choices about crop rotation and crops to grow, start filling in the growing beds on your plan. See how things fit, try to get in a good variety of crops, but don't be too "greedy" (one of my failings!) and try to crowd in too much.

Next you can start on a list of seeds needed. I do a check through my seed drawer, check expiry dates, throw out any that are too old, note the ones that I can use this year. Then start on a list of what I need to get in.

Allotment Growing - Planning

My plan for this year is still partly in my head - every time I go out to my plot in Winter I take a look around and start visualising what it wall all look like in a few months time. Helps me to get through the Winter!

Finally - growing is not just about planning, its also about doing!
So while we all wait for Spring to come and growing to start in earnest, here are a couple of things that you can get on with right now on the allotment:

A Year on the Allotment - January - Preparing Ground

A Year on the Allotment - January - Compost Bins

More posts for A Year on the Allotment coming soon.
Get inspired - get going.
Happy growing!

Sunday, 21 January 2018

Sunday On The Allotment - Winter Clearing

St Ives Cornwall Allotment - Winter


As I looked out of the back door this morning I did wonder about going out to my plot - or staying indoors in the warm.

A bit wild and windy in West Cornwall today, but not too cold so I decided to brave the weather and was glad that I did. It wasn't so bad once I got moving.

For the last couple of weeks I've focussed on on simple task - clearing growing beds ready for sowing seeds in March. First to go in will be Potatoes and Broad Beans, so I'm working on the beds earmarked for those first.

Allotment Growing - Potato Bed

One thing that I've learned in previous years is that putting effort into preparation now pays big dividends later in the growing season. Its also relatively easier because, while there are still some weeds to clear, they are fairly dormant and so easier to get out.

My method is simply to hoe over the ground, remove weeds and any big stones that pop up. Then I add a layer of leaf mould followed by a layer of compost from the bins on my plot. I don't do much more digging, unless I need to. I leave everything to bed down and work in naturally - as I've said before on this blog - let the Worms and Weather do the work!

Allotment Growing - Potato Bed

So my potato bed is now pretty much ready. I'm just wondering whether to add a bit of manure from my pile and maybe some chicken manure pellets. Now I've just got to be patient and wait until March before getting my spuds in the ground.

If you are a new allotment grower and thinking about growing spuds, you might find this blog post from last year helpful:
Spring On The Allotment - First Sowings - Potatoes

Allotment Growing - Turnips

Before I headed home I checked on the final crops I have left in to harvest over Winter. I still have a few Leeks - and some Turnips that are approaching monster size. I'll need to get those out soon.

Allotment Growing - Swede

Also my Swede - seem to be growing ok but a bit small to harvest just yet. I'll see how they grow on into Spring.

Last Summer I made plans to grow more crops over Winter and exactly as I expected I've had mixed results. As well as the crops above I sowed Winter Spinach and Autumn King Carrots - neither of these have come to much. But I will repeat this next year. If you are interested take a look at my blog post:
Allotment Growing - Autumn and Winter Crops

More news from my little plot in West Cornwall coming soon. More pics and posts are on:
Allotment With A Sea View - Facebook

Wednesday, 17 January 2018

A Year on the Allotment - January - Compost Bins

Allotment Growing - Compost Bin


A Year on the Allotment
A series that aims to help new allotment growers to get started and produce lovely crops to eat.
This post is about getting started on building compost bins and making compost.
This can be added to your plot in future years to improve the soil.

1.2 January - Compost Bins

Compost is a "foundation stone " of the allotment - in my opinion.

Making your own compost on the plot is a great way of recycling goodness back into the ground year on year. It will improve both the fertility and structure of your soil.

It will also save you money - and this is one reason why many allotmenters have a plot in the first place. You'll have less need, or no need, to buy in compost and manure.

Allotment Growing - Compost
So - building a compost bin, or more if possible, is one of the first things to do a a new allotment plot. Making compost takes time so its worth starting right away. It will also help to keep things neat and tidy as you will have somewhere to put stuff as you clear your plot of weeds and other unwanted plants.

Start by planning your layout - on paper, or maybe using a computer based tool if you prefer.

Choose carefully where to put your bins as moving them later would be a pain. Obvious spots are on the edges or corners of the plot. Try to choose a spot that you can get to easily with a wheelbarrow.

The next thing - decide what sort of bin you want.

Plastic "Dalek" Compost Bin
A quick solution is to buy (or scrounge for free!) a plastic "dalek" type bin. The advantage of this is a quick fix - just drop into place. The obvious disadvantage is that it may cost money. Some people think these look a bit unsightly, but I don't personally, they are very functional.

But I have found on my plot that these bins are a bit too small to hold all of the material that I want to compost down. So I've build a couple of much larger bins made from wooden pallets.

Wooden Pallet Compost Bin
I've written a post previously about this - so I won't repeat it here - but please comment if you have anything to add or have any questions:
Building A Wooden Pallet Compost Bin

Finally - if you don't have the time or resources to do any of this yet - that's fine. You can just start a compost heap in one corner, pile up any organic waste materials and tidy it up later if you want.

The main point that I'm trying to make is - just get going and get composting - one way or another!

Here are a couple more blog posts on the subject of compost and composting that you might find helpful:

Spring Preparations on the Allotment - Compost - Part One

Spring Preparations on the Allotment - Compost - Part Two

More posts for A Year on the Allotment coming soon.
Get inspired - get going.
Happy growing!